
FAQ
1. What Devices Support eSIM?
The list below constantly expands as more eSIM-compatible devices get released into the market.
To use an eSIM, your device must be carrier-unlocked and eSIM-compatible. Please refer to the list below to see if your device supports eSIM technology. (Note that country and carrier-specific restrictions may apply.)*
As of December 2025, the eSIM-compatible devices are as follows (in alphabetical order) :
APPLE
- iPhone 17
- iPhone 17 Pro
- iPhone 17 Pro Max
- iPhone Air
- iPhone 16
- iPhone 16 Plus
- iPhone 16 Pro
- iPhone 16 Pro Max
- iPhone 15
- iPhone 15 Plus
- iPhone 15 Pro
- iPhone 15 Pro Max
- iPhone 14
- iPhone 14 Plus
- iPhone 14 Pro
- iPhone 14 Pro Max
- iPhone 13
- iPhone 13 Mini
- iPhone 13 Pro
- iPhone 13 Pro Max
- iPhone 12
- iPhone 12 Mini
- iPhone 12 Pro
- iPhone 12 Pro Max
- iPhone 11
- iPhone 11 Pro
- iPhone 11 Pro Max
- iPhone XS
- iPhone XS Max
- iPhone XR
- iPhone SE (2020)
- iPhone SE (2022)
- iPad Air (from 3rd generation up)
- iPad Pro 11-inch (from 1st generation up)
- iPad Pro 12.9-inch (from 3rd generation up)
- iPad (from 7th generation up)
- iPad Mini (from 5th generation up)
*The following Apple devices DO NOT have eSIM capability:
- iPhone devices from Mainland China.
- iPhone devices from Hong Kong and Macao (except for the iPhone 13 Mini, iPhone 12 Mini, iPhone SE 2020, and iPhone XS).
*For iPhones and iPads purchased in TURKEY:
- If you’re setting up your device for the first time after June 23, 2020, your eSIM will activate after installation. Contact your carrier if you don’t have eSIM enabled.
- For devices set up before the above date, follow the steps in this link to activate your eSIM. The procedure may require you to erase your device’s data – please ensure you back up your device beforehand.
*Only iPad devices with Wi-Fi + Cellular features are supported.*
GALAXY (SAMSUNG)
-
- Galaxy A56*
- Galaxy A55 5G*
- Galaxy A54 5G*
- Galaxy A36*
- Galaxy A35 5G*
- Galaxy A23 5G*
- Galaxy XCover7 Pro
- Galaxy Z Flip
- Galaxy Z Flip 5G
- Galaxy Z Flip 3 5G
- Galaxy Z Flip 4
- Galaxy Z Flip 5
- Galaxy Z Flip6
- Galaxy Z Fold
- Galaxy Z Fold 2 5G
- Galaxy Z Fold 3
- Galaxy Z Fold 4
- Galaxy Z Fold 5
- Galaxy Z Fold 6
- Galaxy Note 20
- Galaxy Note 20 5G
- Galaxy Note 20 Ultra
- Galaxy Note 20 Ultra 5G
- Galaxy S20
- Galaxy S20 5G
- Galaxy S20+
- Galaxy S20+ 5G
- Galaxy S20 Ultra
- Galaxy S20 Ultra 5G
- Galaxy S21 5G
- Galaxy S21+ 5G
- Galaxy S21 Ultra 5G
- Galaxy S22 5G
- Galaxy S22+ 5G
- Galaxy S22 Ultra 5G
- Galaxy S23
- Galaxy S23 5G
- Galaxy S23 FE
- Galaxy S23+
- Galaxy S23 Ultra
- Galaxy S24
- Galaxy S24+
- Galaxy S24 Ultra
- Galaxy S24 FE
- Galaxy S25
- Galaxy S25 Edge
- Galaxy S25+
- Galaxy S25 Slim
- Galaxy S25 Ultra
- Galaxy Fold
*The following Samsung Galaxy devices DO NOT have eSIM capability:
- All Galaxy devices originating from China, Hong Kong, and Taiwan.
- All Galaxy FE “Fan Edition” models, except the Galaxy S23 FE.
- USA models of the Galaxy S20, S21*, and Note 20 Ultra.
*Most Samsung Galaxy devices purchased in South Korea do not support eSIMs, except for the Galaxy S23, S23+, S23 Ultra, Z Flip4, Z Fold4, Z Flip5, Z Fold5, A54 5G, and Galaxy S23 FE.*
*Galaxy A54 5G eSIM availability may vary depending on country/region and carrier. Please contact your carrier or device manufacturer to confirm that your Galaxy A54 5G device is eSIM-capable.*
*Galaxy S21 series devices (with the exception of FE models) from Canada and the USA may have eSIM capability as long as the One UI 4 update is installed. Please contact your carrier or device manufacturer to confirm your Samsung device is eSIM-capable.*
GOOGLE PIXEL
- Pixel 10
- Pixel 10 Pro
- Pixel 9
- Pixel 9 Pro
- Pixel 9 Pro XL
- Pixel 9 Pro Fold
- Pixel 8 Pro
- Piexel 8a
- Pixel 8
- Pixel Fold
- Pixel 7 Pro
- Pixel 7a
- Pixel 7
- Pixel 6 Pro
- Pixel 6a
- Pixel 6
- Pixel 5a
- Pixel 5
- Pixel 4a
- Pixel 4
- Pixel 4 XL
- Pixel 3 & 3 XL*
- Pixel 3a & 3a XL*
- Pixel 2
- Pixel XL
- Pixel Fold
*The following Google Pixel devices DO NOT have eSIM capability:
- Pixel 3 models originating from Australia, Taiwan, and Japan, and those purchased with service from US or Canadian carriers other than Sprint and Google Fi.
- Pixel 3a models purchased in South East Asia and with Verizon service.
HAMMER
- Explorer PRO
- Blade 3
- Blade 5G
- myPhone NOW eSIM
- myPhone Hammer Construction
*eSIM support is only available in certain regions. Please contact your carrier or device manufacturer to confirm that your Hammer device is eSIM-capable.*
HONOR
- HONOR 200
- HONOR 200 Pro
- HONOR 400 Lite
- HONOR 400
- HONOR 400 Pro
- Magic 7 Pro
- Magic 7 Lite
- Magic 6 Pro
- Magic 6 Pro RSR
- Magic Vs3
- Magic V2*
- Mgic V3
- Magic5 Pro
- Magic4 Pro
- Honor 90
*eSIM support is only available in certain regions. Please contact your carrier or device manufacturer to confirm your Honor device is eSIM-capable.*
HUAWEI
- P40
- P40 Pro*
- Mate 40 Pro
*The following HUAWEI devices DO NOT have eSIM capability*
- Huawei P40 Pro+
- All Huawei devices purchased in China are not eSIM capable.
MOTOROLA
- Moto G34
- Moto G35
- Moto G53
- Moto G54
- Moto G54 Power
- Moto G55
- Moto G75
- Moto G85
- Moto G86
- Moto G (2025)
- Moto G (2024)
- Moto G Stylus 5G
- Edge Fusion
- Edge 60
- Edge 60 Pro
- Edge 60 Fusion
- Edge 60 Stylus
- Edge 50
- Edge 50 Pro
- Edge 50 Neo
- Edge 50 Ultra
- Edge 40 Neo
- Edge 40 Pro
- Edge+
- Edge+ (2023)
- Edge (2024)
- Edge (2023)
- Edge (2022)
- Razr Ultra (2025)
- Razr 40
- Razr 40 Ultra
- Razr 50
- Razr 50 Ultra
- Razr 60
- Razr 2024
- Razr+ 2024
- Razr 2022
- Razr 2019
- Razr 5G
- G53 5G
- ThinkPhone 25
*eSIM support is only available in certain regions. Please contact your carrier or device manufacturer to confirm that your Motorola device is eSIM-capable.*
NOKIA
- G60
- XR21
- X30
*eSIM support is only available in certain regions. Please contact your carrier or device manufacturer to confirm your Nokia device is eSIM-capable.
ONEPLUS
- OnePlus 13
- OnePlus 13R
- OnePlus 12
- OnePlus 11
- OnePlus Open
*eSIM support is only available in certain regions. Please contact your carrier or device manufacturer to confirm that your OnePlus device is eSIM-capable.
OPPO
- Reno6 Pro 5G
- A55s 5G
- Find N2 Flip
- Find N5
- Find X3 Pro
- Find X3
- Find X5
- Find X5 Pro
- Find X8 Pro
- Find X8
- Reno 14
- Reno 14 Pro
- Watch X2 Mini
*eSIM availability may vary depending on country/region and carrier. Please contact your carrier or device manufacturer to confirm that your Oppo device is eSIM-capable.*
RAKUTEN
- Rakuten Big
- Rakuten Big S
- Rakuten Mini
- Rakuten Hand
- Rakuten Hand 5G
*eSIM support is only available in Japan and certain regions. Please contact your carrier or device manufacturer to confirm that your Rakuten device is eSIM-capable.*
SHARP
- AQUOS Sense 9
- AQUOS Sense 8
- AQUOS Sense 7
- AQUOS Sense 7 plus
- AQUOS R10
- AQUOS R9 Pro
- AQUOS R9
- AQUOS R8 Pro
- AQUOS R8
- AQUOS R8s pro
- AQUOS Wish
- AQUOS Zero 6
*eSIM support is only available in Japan and certain regions. Please contact your carrier or device manufacturer to confirm that your Aquos device is eSIM-capable.*
SONY
- Xperia 1 V
- Xperia 1 IV
- Xperia 1 VI
- Xperia 1 VII
- Xperia 5 IV
- Xperia 5 V
- Xperia 10 III Lite
- Xperia 10 IV*
- Xperia 10V
- Xperia 10 V1
*eSIM availability may vary depending on country/region and carrier. Please contact your carrier or device manufacturer to confirm that your Xperia device is eSIM-capable.*
Sony Xperia 10 IV eSIM support is only available in Europe. Please contact your carrier or device manufacturer to confirm that your Sony Xperia 10 IV device is eSIM-capable.
T-Mobil*
- Revvl 7
- Revvl 7 Pro
*eSIM availability may vary depending on country/region and carrier. Please contact your carrier or device manufacturer to confirm that your Xperia device is eSIM-capable.
TCL*
- 60
- 60 XE NxtPaper
- 50 5G
- 50 NxtPaper
- 50 Pro NxtPaper
- 40 XL
*eSIM availability may vary depending on country/region and carrier. Please contact your carrier or device manufacturer to confirm that your Xperia device is eSIM-capable.
VIVO*
- X200 Pro
- X200
- X200 FE
- X200s
- X100 Pro
- X90 Pro*
- V29 (Europe and Latin America)*
- V29 Lite 5G (Europe)*
- V40
- V40 Lite (Europe)*
- V50
- Watch 5
*eSIM availability may vary depending on country/region and carrier. Please contact your carrier or device manufacturer to confirm that your Xperia device is eSIM-capable.
eSIM availability may vary depending on country/region and carrier. Please contact your carrier or device manufacturer to confirm that your Vivo device is eSIM-capable.
XIAOMI
- 15
- 15 Ultra
- 14
- 14 Pro
- 14T
- 14T Pro
- 13T
- 13T Pro
- 13
- 13 Pro
- 13 Lite
- 12T Pro
- Redmi Note 14 Pro
- Redmi Note 14 Pro 5G
- Redmi Note 14 Pro+
- Redmi Note 14 Pro+ 5G
- Redmi Note 13 Pro
- Redmi Note 13 Pro +
- Redmi Note 11 Pro 5G*
*eSIM availability may vary depending on country/region and carrier. Please contact your carrier or device manufacturer to confirm your Xiaomi device is eSIM-capable.*
Redmi Note 11 Pro 5G eSIM support is only available in Japan. Please contact your carrier or device manufacturer to confirm your Redmi Note 11 Pro 5G device is eSIM-capable.
OTHERS
- Fairphone 4
- Fairphone 5
- Gemini PDA 4G+Wi-Fi
- Nothing Phone (3a) Pro
- Nuu Mobile X5
- Realme 14 Pro+
- ASUS Zenfone 12 Ultra
- ZTE nubia Flip2
- alcatel V3 Ultra
*Surface: Any AT&T-locked devices will not support eSIMs. If your device was purchased through another carrier, the carrier may have disabled eSIM capability in the Surface Duo.
*eSIM availability may vary depending on country/region and carrier. Please contact your carrier or device manufacturer to confirm your device is eSIM-capable.*
WINDOWS 10/ WINDOWS 11 LAPTOPS
ACER
- Acer Swift 3
- Acer Swift 7
- Acer TravelMate P2
- Acer TravelMate Spin P4
- Acer TravelMate P6
ASUS
- ASUS Mini Transformer T103HAF
- ASUS NovaGo TP370QL
- ASUS Vivobook Flip 14 TP401NA
DELL
- Dell Latitude 7440
- Dell Latitude 7210 2-in-1
- Dell Latitude 9410
- Dell Latitude 7310
- Dell Latitude 7410
- Dell Latitude 9510
- Dell Latitude 5410
- Dell Latitude 5411
- Dell Latitude 5511
HP
- HP Elitebook G5
- HP Probook G5
- HP Zbook G5
- HP Spectre Folio 13
LENOVO
- ThinkPad X1 Titanium Yoga 2 in 1
- ThinkPad X1 Carbon Gen 9
- ThinkPad X1 Fold
- ThinkPad X1 Nano
- ThinkPad X12 Detachable
- Lenovo Flex 5G
- Lenovo Yoga C630
- Lenovo Miix 630
- Lenovo Yoga 520
- Lenovo Yoga 720 (2-in-1 models)
SURFACE
- Surface Pro 9
- Surface Go 3
- Surface Pro X
- Surface Duo 2
- Surface Duo
*For Windows 10: Your PC needs to have Windows 10 version 1703 or later for you to use an eSIM. The device also needs to be LTE-ready.*
*Surface: Any AT&T-locked devices will not support eSIMs. If your device was purchased through another carrier, the carrier may have disabled the eSIM capability in the Surface Duo. Please contact the carrier to confirm.
2. What is an eSIM?
An eSIM, or embedded SIM, is a digital SIM card that allows you to activate a cellular plan without the need for a physical SIM card. It is embedded directly into your device, making it convenient and easy to use.
3. How do I install and activate my eSIM?
Installing and activating your eSIM is simple. Just follow these steps:
- Go to the settings on your device.
- Select "Cellular" or "Mobile Data".
- Choose "Add Cellular Plan" or "Add Data Plan".
- Scan the QR code provided with your eSIM purchase.
- Follow the on-screen instructions to complete the activation process.
4. How do I change my APN settings?
Your APN, or‘ Access Point Name’, is a crucial setting on your device. Sometimes, you may need to customise your device's APN settings to ensure data access with certain eDataSIM eSIMs.
If the APN settings are required for your eSIM, you can find the APN details on your eSIM installation notification email.
Please follow these steps to set up an APN:
On iOS:
1. Go to Settings on your device
2. Go to Cellular/Mobile Data

3. Select your eSIM under Cellular/Mobile Data Plans

- Go to Cellular/Mobile Data Network

5. Type the new APN settings in the Cellular/Mobile Data APN field as written in the eSIM installation details (all lower case, all one word)

*globaldata is an example. Please note that different eSIMs may require different types of APNs. You can learn your eSIM's APN by checking your eDataSIM activation email. If the APN is unavailable, the eSIM's APN is automatically configured.
On Android:
1.Go to Settings on your device
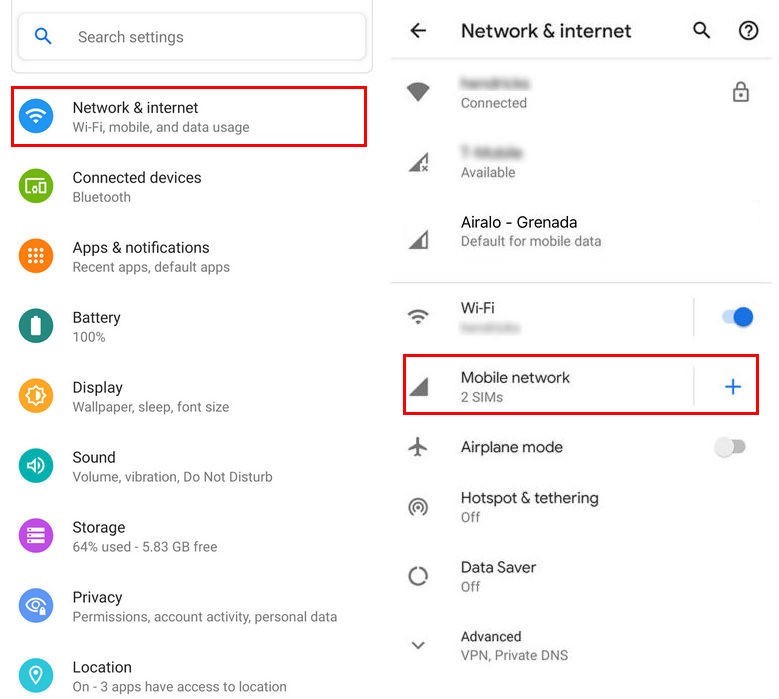
2.Go to the Network & Internet section
3. Go to Mobile Networks

- Go to Access Point Names
- Type the new APN settings as written in the eSIM installation details (all lowercase, all one word) [caption

*globaldata is an example. The correct APN settings will be shared with you in your eSIM activation email.
- You can leave the other fields blank.
5. I am experiencing slow network speeds
Speed depends on coverage, congestion, or prioritisation of the local carrier.
However, if your eSIM requires you to manually add/update your APN settings - and if you do not add it correctly - it may be misunderstood as if your connection is slow, while the eSIM was not set up correctly.
If you are experiencing slow network speeds, please check if you have met all the requirements from your eSIM installation page and proceed as below:
- Set up your APN settings (if required)
- Set the device to 3G temporarily

If you are experiencing slow network speeds after completing the above, please try to:
- Set your device to 3G only if available


- Toggle the airplane mode on and off
In case your eSIM supports more than one network, you can also try to select a different network than you are currently connected to, in order to see if it provides a better service.
6. I’m experiencing the “This code is no longer valid” error
Rest assured, the 'this code is no longer valid' error is common when attempting to add an eSIM that has been added before or when the QR code was partially scanned due to a poor connection.
To confirm whether the eSIM has been installed or not, please proceed as below:
- Go to Settings
- Go to General
- Tap About and scroll down
If the eSIM is installed and turned on, you should be able to view the ICCID [NUMBER] + an extra digit as long as the eSIM line is “On” under your Cellular Plans.

Please note that if the eSIM has been removed and you attempt to reinstall it, it will not be possible!
On the other hand, if you install the eSIM for the first time, this error message could be due to a poor connection, VPN enabled, or too many eSIMs installed on the device.
Please follow the steps below to install your eSIM successfully:
- Disable any VPNF
- Ensure that you have a good and stable internet connection
- Remove any eSIMs you will no longer use
- Check if the software is updated to the latest version
- Try to install an eSIM through an installation method different than before
7. What can I do if my device is network- or carrier-locked?
If you’ve purchased your device through a mobile network provider or carrier, your device may be network or carrier-locked. This means your provider has placed restrictions on your device, limiting your ability to connect to other networks.
If your device is network or carrier-locked, you won't be able to install an eSIM. To use an eSIM, it's essential to reach out to your mobile network provider or carrier to unlock your device.
If your device has recently been unlocked, your carrier may have disabled eSIM support for a period of time as a security precaution. Please contact your mobile network provider or carrier to override the device’s security settings in these cases.
If you have any questions, please contact support. We’ll be happy to help.
8. How do I access the internet using an eDataSIM eSIM on an iOS device?
If you encounter difficulties connecting your eDataSIM eSIM to the internet on an iOS device after installation, please ensure that you have completed the Access Data steps for your eSIM.
You can find them in your eDataSIM activation email- “ Your eDataSIM Code is Here!”
Before you proceed with the next steps, it's essential to check that the eSIM line is ENABLED and selected for cellular/mobile data. This is a prerequisite for accessing the internet.
- Go to Settings.
- TAP Cellular or Mobile.
- TAP your eSIM.
- ENSURE that the eSIM is enabled. If not, toggle it ON.
TAP Cellular or Mobile Data and select your eSIM.
Connect to the Supported Network:
- Go to Settings.
- TAP Cellular or Mobile.
- TAP your eSIM.
- TAP Network Selection.
- DISABLE Automatic.
It's important to SELECT the network specified in your eSIM’s Access Data information. This is a crucial step in connecting to the internet using your eSIM.

Update the APN settings (if necessary):
CHECK if you need to modify the APN on your device by opening the eDataSIM activation email and viewing your eSIM instructions.
- GO to Settings.
- TAP Cellular or Mobile.
- TAP your eSIM.
- TAP Cellular or Mobile Data Network.
- ENTER the APN in the APN fields.
- LEAVE the other fields blank.
TAP Reset Settings should the APN be set automatically.

Enable Data Roaming (if necessary):
CHECK if you need to enable Data Roaming on your device by opening the eDataSIM activation email and viewing your eSIM instructions.
- GO to Settings.
- TAP Cellular or Mobile.
- TAP your eSIM.
TOGGLE Data Roaming ON or OFF.

9. Can I use iMessage with my eSIM?
Yes, you can easily use iMessage with your eSIM, ensuring a seamless communication experience.
Please remember that you may need to reset iMessage after installing your eSIM. You can do so by following the steps below:
- Go to Settings on your device
- Go to Messages

3. Toggle iMessage OFF

4. Toggle iMessage back to ON

5. Tap on Send & Receive.

6. Uncheck your number and make sure your email address is checked. You can send and receive iMessages with only a data connection.

When you no longer have a need for your eSIM, and wish to switch back to your Primary SIM, you can do so by following these steps: Settings > Messages > Send & Receive and check your phone number again.
You may also check our video below for further details:

10. I am experiencing “PDP Authentication Failure”
The PDP Authentication Failure can be related to your settings or eSIM data/validity. Please check if you have experienced the following items:
- The APN is set according to the information from your eSIM installation page if required (all lowercase and in one word)
- You have remaining data on your eSIM: if you try to connect without remaining data, you may encounter this error.
- You are connected to the supported network as your eSIM installation page advises.
To find the eSIM installation page and all the details, please go to My eSIMs > Details > Install eSIM and scroll down the page. In this case, please reset your network settings. If the above steps do not help, please try resetting your network settings*:
- Go to Settings on your device
- Go to General
- Go to Reset
- Go to Reset Network Settings
- Restart your device
*Resetting network settings reset existing WiFi networks and passwords, cellular settings, and VPN and APN settings.
If the issue persists after following the above steps, please do not hesitate to contact us for further assistance. We are here to help you resolve this issue. If you have any questions, please feel free to reach out to our support team.
11. I’m experiencing the ‘Unable to Complete Cellular’ error message
The Unable to Complete Cellular Plan Change error message is related to an installation failure which can be caused by different factors as follows:

This error may show if you are trying to install an eSIM on a network-locked device.

You can check if your device is locked by following the steps below:
- Go to Settings > General, and tap About.
- Under Carrier Lock, you should see a message that says No SIM restrictions. If you don't see that message, please contact your carrier to have your device unlocked.
Please contact support if you have confirmed with your current provider that your device is unlocked.
12. What should I do if the eSIM is stuck activating on my iOS device?
Sometimes, an eSIM can get stuck activating on an iOS device. This usually happens when you have installed an eSIM but haven't yet arrived at your destination country/region. You can rest easy knowing that the eSIM is fully installed, even if it displays "activating" or "activation failure.". The activation process will finish when you reach your destination and are within the network coverage area. Here are some screenshots for reference:

Remember, even if the eSIM remains stuck on activating, you should still be able to use other features that don't rely on network connectivity. Once you reach your destination and the device is within the network coverage area, the eSIM should activate successfully, and you can start using it. If you have any questions, please contact our support team; we'll gladly help!
13. What to do if I can’t delete an eDataSIM eSIM on my Samsung Galaxy S22?
Some Samsung Galaxy S22 users have reported a known issue: they cannot delete an eDataSIM eSIM profile from their device, or the SIM manager fails to load due to a software bug. This issue can be frustrating, but do not worry — workarounds are available to help you manage your eSIMs until a software update from Samsung is released to fix the problem. Check for Software Updates. If an update is available, please download and install it.
- Go to Settings.
- SCROLL DOWN and TAP Software update.
- TAP Download and install.
Remove/Add a Physical SIM. This will force the SIM manager to reload.
- INSERT the SIM removal pin into the hole to release the tray.
- PULL the tray out gently from the tray slot.
- ENSURE that a physical SIM is in the tray.
- INSERT the tray back into the tray slot.
Restart your device. A simple reboot can resolve any technical issues.
- PRESS and HOLD the side key and the volume down button simultaneously.
- TAP Restart.
- TAP the Restart option again.
Reset the Network settings. This will reset all network settings, including Wi-Fi, Mobile data, and Bluetooth.
- Go to Settings.
- SCROLL DOWN and TAP General management.
- TAP Reset.
- TAP Reset network settings.
- TAP Reset settings to confirm.
Should the eDataSIM eSIM deletion issue persist after doing the workarounds above, please contact Samsung or your carrier, as the issue might be related to the device's software. If you have any questions, please contact our support team; we'll gladly help!
14. How many eDataSIM eSIMs can I install?
eSIM-compatible devices offer the flexibility to install multiple eSIMs. Nevertheless, depending on the device model, the number of eSIMs you can have active simultaneously may vary. Dual Active Dual SIM standby devices allow multiple eSIMs to be installed at any time. For instance, iPhones can store between five and 10 eSIMs, whereas Samsung Galaxy, Google Pixel, Huawei, and Android devices allow five to seven eSIMs. However, the number of eSIMs you can have active on your device will change according to the device model. For iPhone 13 and newer and Google Pixel 7 and newer, you can use Dual SIM with either two active eSIMs or a nano-SIM and an eSIM. iPhone 12 models, iPhone 11 models, iPhone XS, iPhone XS Max, and iPhone XR feature Dual SIM with a nano-SIM and an eSIM, but you can only have one eSIM active at a time. On most Android devices, only one eSIM can be active. However, on Google Pixel 7 and later models, you can use two eSIM profiles simultaneously if your carrier allows it. If you need more assistance, please contact our support team; we'll gladly help.
14. How do I know which eSIM is using data?
Here’s how you can find out which of your eSIMs are using data:
On iOS:
To check which eSIM is selected for data, please follow these steps:
- Go to Settings on your device
- Tap Cellular or Mobile
- Go to Cellular Data to see the plan used for data
If you have multiple eSIMs installed, your device will display the available plans as long as they are "On" under Cellular Plans.


On Samsung devices:
- Go to Settings on your device
- Go to Connections
- Go to SIM Card Manager
- Scroll down and check under Preferred SIM card, which line is selected under Mobile Data.

15. How can I check my current data usage?
Your current data usage can be found in your device settings, as shown below.
On iOS:
- Go to Settings on your device
- Go to Cellular/Mobile Data
- The amount of data used can be found under Current Period Roaming.
You can also see the instructions from the Apple website here.
On Android:
- Open your phone's Settings app.
- Tap Network and Internet
- Tap Data usage or Mobile Network
You can find your data usage under Mobile.
16. What happens to the unused data after the validity period?
The eSIM data can only be used within the validity period, which means the remaining unused data cannot be used after the validity period. If the eSIM is rechargeable, a new data package can be added by tapping "TOP UP" on your eSIM to continue using the same eSIM.
17. Can I install the same eSIM on multiple devices?
eSIMs are designed for single-device use. They can’t be installed or reinstalled on multiple devices.
Once you've activated an eSIM on a specific device, it becomes tied to that device and can’t be transferred to another device. This restriction is in place to ensure the highest level of security, keeping your eSIM securely associated with your intended device and user.
If you remove the eSIM from your device for any reason, such as upgrading to a new device or troubleshooting issues, you won't be able to reinstall it on the same or any other device. You would need to purchase a new eSIM to connect to a mobile network on your device.
Please ensure you only install an eSIM on the device you intend to use for the eSIM’s validity period.
18.
No, eSIMs typically can’t be reinstalled. We highly recommend you don’t remove any eSIM that you still intend to use.
Once an eSIM is removed from your device, you may encounter an error when trying to download it again. You will need to purchase, install, and activate a new eSIM to access mobile networks in your destination.
We recommend temporarily disabling the eSIM when you are not using it. Please note that your validity period is not paused when you temporarily disable your eSIM.
Why you should not remove an eSIM that you still want to use
Unlike traditional physical SIM cards that can be swapped between devices, eSIMs are tied to the device's hardware and cannot be easily transferred or reinstalled.
When an eSIM’s validity period ends or runs out of data, you can still top up that eSIM with a new data package. Go to the corresponding Top-up eSIM on the eDataSIM website to purchase a top-up eSIM. Link to Top-up eSIM plans.
Why you might want to disable your eSIM temporarily
Temporarily disabling an eSIM can help you conserve data when you're not actively using the eSIM. This also prevents your eSIM from consuming data in the background, which can be particularly useful when travelling or when you have limited data plans.
To temporarily disable an eSIM on iOS devices:
-
Go to Settings > Cellular > SIMs.
2. Scroll to and select the relevant eSIM.
3. Toggle Turn This Line On off.
To temporarily disable an eSIM on Android devices:
-
Go to Settings > SIM cards & mobile networks.
2. Scroll to Manage eSIM and select the relevant eSIM.
3. Select Disable from the “Disable mobile plan” prompt.
Keep in mind that disabling the eSIM does not deactivate it permanently. Your eSIM is put in a dormant state until you choose to reactivate it.
19. Can I make phone calls or send SMS with my eSIM?
For all eDataSIM eSIMs, you will not be able to make phone calls or send SMS text messages, as our eSIM packs provide data only. Telephony services like Texts(SMS) and calls are not possible using a Data-only eSIM. However, you can use internet-based calls and messages.
Please note that if you plan to use third-party apps for calling or texting over the internet, ensure that you already have it set up before using your eSIM.
You can check what kind of plan is supported for your desired eSIM prior to purchase by checking the additional Information as shown below. Plan Type: Data Only
On the eDataSIM website

20. Can I receive phone calls on my primary number?
Yes, your primary number should be able to receive calls if your device allows you to have a SIM and eSIM activated simultaneously. If you are using an iPhone, particular models have the Dual SIM Dual Standby (DSDS) technology that allows you to remain connected with both your SIM and eSIM simultaneously.
However, the number of eSIMs you can have active on your device will change according to the device model. With the iPhone 13 Pro Max, iPhone 13 Pro, iPhone 13, and iPhone 13 mini, you can use Dual SIM with either two active eSIMs or a nano-SIM and an eSIM. iPhone 12 models, iPhone 11 models, iPhone XS, iPhone XS Max, and iPhone XR feature Dual SIM with a nano-SIM and an eSIM, but you can only have one eSIM active at a time.
For more information, please get in touch with your device's manufacturer. Please remember that data roaming charges may apply to the call service depending on your carrier provider.
21. Can I use 5G with my eSIM?
Several eSIMs support up to 5G cellular or mobile networks. However, this may vary depending on your device. Please note that 5G networks are only available in supported countries and regions. You can find out if the eSIM you intend to buy supports a 5G network by scrolling down the page on the eSIM you want to purchase to view the eSIMs additional information.
You can check whether or not your desired eSIM supports 5G or not by checking the eSIMs Network information.
The eSIMS network information will be displayed as below;

*An area with 5G coverage is required to connect to a 5G network. Being too far away may cause speeds to slow down or drop to a 4G or LTE connection.
22. Why don’t I see 5G in the status bar on my iPhone?
After confirming that your device* and eSIM support a 5G network, you should be able to connect with a much higher data speed. If you don't see 5G indicated in your iPhone's status bar, please follow the steps below:
- Ensure that you're in an area with 5G coverage.
- Go to Settings > Cellular/Mobile > TAP the preferred SIM > Cellular/Mobile Data Options. If Voice & Data has 5G On, your device has 5G activated. If 5G is not an option, the eSIM does not support 5G.
- If your device has 5G activated, turn on Airplane Mode, then turn it off to reconnect to a 5G network.

If you still don't have a 5G connection, please contact us on our support channels for further assistance. *Only iPhone 12 models or later work with the 5G cellular or mobile networks. *An area with 5G coverage is required to connect to a 5G network. Being too far away may cause speeds to slow down or drop to a 4G or LTE connection.
23. How do I change my SIM label?
One of the great features of most phones is the ability to store and switch between multiple eSIM profiles, giving you the flexibility to manage your connections as needed.
During eSIM installation, your device will automatically label your new eSIM. Afterwards, you can go to your device settings and change it.
We recommend picking a name that easily identifies the eSIM (e.g., Italy eSIM or Airalo eSIM).
Follow these steps to change an eSIM label on your iOS or Android device.
iOS Devices
- Go to Settings.
- TAP Cellular or Mobile.
- Under SIMs, TAP the eSIM you wish to edit.
- TAP Cellular or Mobile Plan Label.
- TAP the default eSIM label.
- RENAME it in the Custom Label field.

Samsung Galaxy Devices
- Go to Settings.
- TAP Connections.
- TAP SIM card Manager.
- TAP the eSIM profile you wish to edit.
- RENAME the eSIM.
- TAP is done once you have renamed the eSIM.

Google Pixel Devices
- Go to Settings.
- TAP Network & Internet.
- TAP SIMs and choose the preferred eSIM you wish to edit.
- TAP the pencil symbol.
- RENAME the eSIM (you can also change the label's colour).
- TAP Save once you have renamed the eSIM.

Your eSIM should now be renamed on your device. If you change your mind, don't worry — you can edit an eSIM label as often as you like.
24. How to install eDataSIM with a QR code on a Samsung Galaxy device?
Before you start, make sure to check the following items in order to guarantee that you are able to successfully install and set up your eSIM:
-
Your device is eSIM compatible and carrier unlocked.
Check What devices support eSIM? - You have a stable connection, preferably WiFi. (You need to download the eSIM properly to your device and a stable internet connection is a must.)
- QR code and activation code can only be used once for security purposes. If you cancel the eSIM activation/installation in the middle of the process, the code will no longer be valid.
- Your eSIM can only be installed on one device and only once. This imeans that if you remove the eSIM from your device, it will be not be possible to install it again.
I. PREPARATION
- Open the email "Your eDataSIM Code is Here!", with the QR code and activation code.
- Take a screenshot of the QR code.
II. INSTALLATION
- On your device, swipe down and tap Settings.
- Tap Connections.
- Tap SIM Manager.

- Tap Add eSIM.
- Tap Scan QR code.
- Tap the Gallery/Photos icon.

- Select the QR code.
- Tap Done.
- Tap Add.
- Wait for a few minutes for your eSIM to activate.

After completing these steps, the installation page will close.
ACCESSING DATA
- Tap Mobile Data.
- Select your eSIM.
- Go back to Connections.
- Tap Mobile Networks.
- TOGGLE Data Roaming ON.
- Check if you need to update your APN by opening the "Your eDataSIM code is here!" email.
> If the message displayed in the APN field reads Automatic, no further action is required.
> If the message displayed in the APN field reads Manual, you must update your APN manually. - Go back to Connections.
- Tap Mobile Networks.
- Tap Access Point Names.
- Tap Add.
- Enter the new APN in the APN field.
- Tap OK.
- Enter your desired label for the eSIM on the APN's Name Field.
- Leave the other fields blank.
- Tap the three-dot-menu in the upper right corner.
- Tap Save.

Your eSIM should automatically connect to a supported mobile network.
25. How can I save data usage on my iOS device?
Enabling Low Data Mode
With iOS 13 and later, Apple users have the power to enable Low Data Mode. This feature allows you to independently limit and save cellular and Wi-Fi data, putting you in control of your usage.
Getting started is a breeze. Just follow these simple steps, and remember, your carrier might have its own unique Low Data Mode settings.
- Go to Settings and TAP Cellular or Mobile Data.
- TAP your preferred SIM.
- TAP Data Mode.
- ENABLE Low Data Mode.

Disabling Wi-Fi Assist and iCloud Backup
Wi-Fi Assist and iCloud Backup may be enabled by default. If you don't want your iOS device to stay connected to the internet when you have a poor Wi-Fi connection, you can disable Wi-Fi Assist. Disabling iCloud Backup can help you minimise your data usage.
- Go to Settings and TAP Cellular or Mobile Data.
SCROLL down and DISABLE Wi-Fi Assist and iCloud Backup.

26. How can I save data usage on my Android device?
Android devices come with a Data Saver feature that allows users to control which apps can access data in the background and foreground. Background apps consume a lot of data, so managing their access can help you save data usage. Here’s how to do it.
For Samsung Galaxy devices:
- OPEN the Settings app, and then TAP Connections.
- TAP Data usage.
- TAP Data saver.
- TAP the switch next to Turn on Now to activate the Data Saver feature.
You can also choose which apps can continue using mobile data when Data Saver is enabled. Tap Allowed to use data while the Data saver is on, then tap the switch next to the app(s) to grant permission.

For Google Pixel devices:
- OPEN the Settings app, and then TAP Network & Internet.
- TAP Data Saver.
- TAP the switch next to Use Data Saver to activate the Data Saver feature.
You can also choose which apps can continue using mobile data when Data Saver is enabled. TAP Unrestricted data, then TAP the switch next to the app(s) to grant permission.
![]()
27. When can I install my eSIM?
In order to know when you can install your eSIM, you must be aware of the activation policy.
Most eSIMs will only activate at the destination once they connect to a supported network or any of the supported networks.
On the other hand, some eSIMs will activate instantly as soon as they are installed, regardless of the location.
How can I know when my eSIM will activate?
You must check your eSIM’s activation policy.
Before purchase:
- Search for the country you wish to buy an eSIM for
- Select the eSIM that you like
- Check Activation under the Product Description
The activation policy will be either as follows
- “The validity starts when the eSIM connects to any supported network(s)”: This means that you can install the eSIM before traveling without activating it. Once you arrive at the destination, you can connect by turning on your eSIM line as long as the setup has been completed, as advised in the eSIM Activation Code email sent to you after your purchase.
- “The validity period starts at the installation”: This means that your eSIM will activate instantly once installed, and hence, the validity period will start to run. However, you are not yet at the destination.
28. How do I install an eSIM on my Google Pixel device?
Before you start, please check the following items in order to guarantee that you are able to successfully install and set up your eSIM:
-
Your device is eSIM compatible and carrier unlocked.
Check What devices support eSIM? - You have a stable connection, preferably WiFi. (You need to download the eSIM properly to your device and a stable internet connection is a must.)
- QR code and activation code can only be used once for security purposes. If you cancel the eSIM activation/installation in the middle of the process, the code will no longer be valid.
- Your eSIM can only be installed on one device and only once. If you delete you remove the eSIM from your device, you cannot install it again.
I. PREPARATION
- Open the email "Your eDataSIM Code is Here!", with the QR code and activation code.
- You should be able to see a QR code and SM-DP+Address and Activation code. Take note of this or keep this page open so you can copy the details later.
II. INSTALLATION
QR CODE METHOD
- In Settings, tap Network & Internet.
- Tap the + icon next to SIMs.
-
Tap Download a SIM Instead? or Download a new eSIM. It there is a pop up message asking if you want to use 2 SIMs, click “Yes.”

- Tap Next and SCAN the QR code found in eDataSIM activation code email.
- TAP Download to install the eSIM.
29. How to install and set up an eSIM on my iOS device?
Before you start, please check the following items in order to guarantee that you are able to successfully install and set up your eSIM:
-
Your device is eSIM compatible and carrier unlocked.
Check What devices support eSIM? - You have a stable connection, preferably WiFi. (You need to download the eSIM properly to your device and a stable internet connection is a must.)
- QR code and activation code can only be used once for security purposes. If you cancel the eSIM activation/installation in the middle of the process, the code will no longer be valid.
- Your eSIM can only be installed on one device and only once. If you delete or remove the eSIM from your device, you cannot install it again.
Follow the step-by-step guide on how to install your eSIM with a QR code or manual method.
I. PREPARATION
- Open the email "Your eDataSIM Code is Here!", with the QR code and activation code.
- You should be able to see a QR code and SM-DP+Address and Activation code. Take note of this or keep this page open so you can copy the details later.
II. INSTALLATION
QR CODE METHOD
- On your device, go to Settings
- Tap Cellular or Mobile Service
- Tap Add Cellular Plan (Add Mobile Data Plan) or Add eSIM

OR

4. Use your printed QR code or another device that displays the QR code to scan your eSIM QR Code

5. If prompted, enter the 4-digit confirmation code. You can skip this step if you are not provided with the confirmation code.
6. Choose a label or customized label for your eSIM.
7. Under the Default Line page, select your eSIM for cellular data only
8. You should see your new eSIM under your Cellular Data or Mobile Data Plans.
MANUAL METHOD
- On your device, go to Settings
- Tap Cellular or Mobile.
- Tap Add Cellular Plan (Add Mobile Data Plan) or Add eSIM
OR
4. Select Enter Details Manually. You will be asked to enter:
-
- SM-DP+ Address
- Activation Code
- Confirmation Code Optional (if available)

5. Choose a label or customized label for your eSIM.
6. Under the Default Line page, select your eSIM for cellular data only
7. You should see your new eSIM under your Cellular Data or Mobile Data Plans.
III. ACCESSING DATA (QR CODE OR MANUAL METHOD)
After installing your eSIM, you must also make the necessary adjustments for connecting as required on your eSIM installation page.
- On your device, go to Settings>Cellular or Settings>Mobile.
- Tap on your newly installed eSIM plan.

3. Toggle TURN ON THIS LINE for your eSIM and enable the Data Roaming

4. On the same page, tap on CELLULAR DATA NETWORK OR MOBILE DATA NETWORK. Depending on your eSIM plan, you may be required to provide the APN (Access Point Name). If required, type the APN on the field provided on your device. You can find the APN details in the "Your eDataSIM Code is Here" email.

5. Go back to Settings>Cellular or Settings>Mobile.
6. Select your eSIM for Cellular Data or Mobile Data. Be sure to turn OFF “Allow Cellular Data Switching” to avoid charges on your other line.
7. Go to your eSIM settings and select the supported network.
30. How to install and set up an eSIM on my Android device?
Before you start, please check the following items in order to guarantee that you are able to successfully install and set up your eSIM:
-
Your device is eSIM compatible and carrier unlocked.
Check What devices support eSIM? - You have a stable connection, preferably WiFi. (You need to download the eSIM properly to your device and a stable internet connection is a must.)
- QR code and activation code can only be used once for security purposes. If you cancel the eSIM activation/installation in the middle of the process, the code will no longer be valid.
- Your eSIM can only be installed on one device and only once. If you delete or remove the eSIM from your device, you cannot install it again.
Follow the step-by-step guide on how to install your eSIM with a QR code or manual method.
I. PREPARATION
- Open the email "Your eDataSIM Code is Here!", with the QR code and activation code.
- You should be able to see a QR code and SM-DP+Address and Activation code. Take note of this or keep this page open so you can copy the details later.
II. INSTALLATION
QR CODE METHOD
- On your device, go to Settings.
- Tap on Network & Internet.
- Tap the Add or + icon next to Mobile Network.
- Tap Next when asked, "Don't have a SIM Card?"
- Scan your QR code and add the confirmation code if prompted
- Go back to your "Install eSIM/Access Data" screen.
- Turn on eSIM under Mobile Network
- Enable Mobile Data
- Enable Data Roaming (Please turn off your primary line to avoid roaming charges from your carrier provider when overseas)
- Go to Network & Internet and tap on the Mobile network to set the correct network preferences listed in the Additional Info which is at the bottom-right of the selected data package page.
- Set up an APN(access point name) on your device if required.
MANUAL METHOD
- Copy the “SM-DP+Address & Activation Code” (manual installation information) from the "Your eDataSIM Code is Here!" email.
- Tap on Network & Internet
- Tap the Add or + icon next to Mobile Network
- Tap Next when asked, “Don’t have a SIM card?”
- Tap Enter Code Manually. You will be asked to enter your SM-DP+Adress as shared on "Your eDataSIM Code is Here!" email.
- Turn on your eSIM under Mobile Network
- Enable Mobile data
- Enable Data Roaming (Please turn off your primary line to avoid roaming charges from your carrier provider when overseas)
- Set up an APN (access point name) on your device if required.
If you have any questions or need further help, just send us a message
31. How do I set a data limit on my Android device?
Setting a mobile data limit on your Android device helps you reduce your data usage. You can select the billing cycle, add the data limit, set a warning before hitting the limit, and more.
Follow these steps to learn how to set your mobile data limit.
For Samsung Galaxy devices:
- OPEN the Settings app, then TAP Connections.
- TAP Data Usage.
- ENSURE that Mobile Data is ON, then TAP Billing cycle and data warning.
- TAP Start billing cycle and SET the date based on your arrival in the destination country.
- ENABLE Set data warning and specify the data warning in numbers. For example, if your eSIM package has 10 GB, you can set a data warning at 8 GB.
- ENABLE Set data limit and specify the data limit in numbers. This option will turn off mobile data when you reach the specified limit.

For Google Pixel devices:
- OPEN the Settings app, then TAP Network & Internet.
- TAP SIMs.
- ENSURE that Mobile Data is ON, then TAP Data warning & limit.
- TAP Mobile data usage cycle and SET the date based on your arrival in the destination country.
- ENABLE Set data warning and specify the data warning in numbers. For example, if your eSIM package has 10 GB, you can set a data warning at 8 GB.
- ENABLE Set data limit and specify the data limit in numbers. This option will turn off mobile data when you reach the specified limit.
If you have any questions, please contact our support team; we’ll be happy to help!
32. How to install?

Please be guided by the following to successfully install and set up your eSIM.
- Your device needs to be eSIM compatible and network unlocked.
Check our Help Center for supported devices. -
You have a stable connection, preferably WiFi, to download the eSIM properly to your device.
You can browse our Help Center for more information on the installation process for your device.
33. Copy of What's an eSIM?

34. How can I remove an eSIM from my iOS device?
You can safely remove eSIMs from your device when:
There is no longer an active data package for the eSIM
You can safely remove eSIMs from your device when:
There is no longer an active data package for the eSIM
- When you buy an eSIM from eDataSIM, it always comes with a data pack that is ready to be activated. You can see this from your account (on the eDataSIM website) if there is still an active data package for your eSIM (not yet expired). Please do not delete the eSIM from the device if this is the case.
You no longer have a use for it
- Some eSIMs from eDataSIM can only be used once and can’t be topped up. You can remove these eSIMs after using them.
- If you have an eSIM that you no longer plan to use, you can also safely remove it.
Your new eSIM is for the same country/region
- When you buy an eSIM from the store, you will receive a new eSIM each time. The new eSIM will always need to be installed. It’s always best to start installing it on a clean slate to avoid confusion about which eSIM is on the device.
To remove your eSIMs from the device, navigate to your device’s Mobile/Cellular Settings, tap on the eSIM you want to delete, and select “Remove Mobile Data Plan”. Depending on the device, it can also be “Remove eSIM”, “Delete Mobile Plan”, or something similar.
For the step-by-step instructions on how to remove eSIMs from iOS devices, please refer to ‘Step-by-step-How can I remove an eSIM from my iOS device?’.
35. How can I remove an eSIM from my iOS device?
You can safely remove eSIMs from your device when:
There is no longer an active data package for the eSIM
You can safely remove eSIMs from your device when:
There is no longer an active data package for the eSIM
- When you buy an eSIM from eDataSIM, it always comes with a data pack that is ready to be activated. You can see this from your account (on the eDataSIM website) if there is still an active data package for your eSIM (not yet expired). Please do not delete the eSIM from the device if this is the case.
You no longer have a use for it
- Some eSIMs from eDataSIM can only be used once and can’t be topped up. You can remove these eSIMs after using them.
- If you have an eSIM that you no longer plan to use, you can also safely remove it.
Your new eSIM is for the same country/region
- When you buy an eSIM from the store, you will receive a new eSIM each time. The new eSIM will always need to be installed. It’s always best to start installing it on a clean slate to avoid confusion about which eSIM is on the device.
To remove your eSIMs from the device, navigate to your device’s Mobile/Cellular Settings, tap on the eSIM you want to delete, and select “Remove Mobile Data Plan”. Depending on the device, it can also be “Remove eSIM”, “Delete Mobile Plan”, or something similar.
For the step-by-step instructions on how to remove eSIMs from iOS devices, please refer to ‘Step-by-step-How can I remove an eSIM from my iOS device?’.
36. Step-by-step- How can I remove an eSIM from my iOS device?
You can delete the eSIM(s) you will no longer use or temporarily disable an eSIM in your device’s settings.
To delete an eSIM:
- Go to Settings on your device
- Go to Cellular/Mobile
- Tap on your eSIM
- Select Remove Mobile Data Plan

5. You may get the option to “Remove eSIM” or “Delete Mobile Plan,” depending on your device.

To temporarily disable an eSIM:
- Go to Settings on your device
- Go to Cellular/Mobile
You should see the option to “Turn on/off this line.” This disables the eSIM temporarily. You can re-enable or reuse this eSIM at a later time. (Note that the eSIM validity cannot be paused, so your eSIM will still expire after its validity period).

37. What's an eSIM?
An eSIM is a digital SIM card that connects you to a mobile network. Unlike a physical SIM card, it's embedded into your device and can download carrier data remotely.
eSIMs work like a physical SIM but don't require removal to change your carrier, data, or service plan. Instead, you can instantly download an eSIM data plan and connect to a mobile network. Your phone stores these plans as eSIM profiles that you can easily turn on and off, making it simple to maintain multiple home, work, and travel plans.

Out with the Old, in with the eSIM
Traditional SIM cards are like physical keys that unlock the door to your mobile network. You insert these keys (SIM cards) into your phone to gain access to the network.
Imagine eSIMs as digital keys stored directly within your device's software. Instead of needing a physical key (SIM card), your device already has the digital key programmed into its software. So, when you want to connect to a mobile network, your device activates the eSIM, just like unlocking the door with a digital passcode instead of inserting a physical key.
eSIM is like a virtual key that lives inside your device's software, providing the same access to mobile networks as a physical SIM card without needing any hardware.
It's essential to keep in mind that eSIMs will only work on eSIM-compatible and network-unlocked devices.
To guarantee that you can use eSIM plans on your device, you can check our list of eSIM-compatible devices or go straight to your device's settings to verify its eSIM capability.
38. How do I check if my Android device supports eSIM?
Whether a device is eSIM-compatible depends on whether the manufacturer includes eSIM software. That’s why we have a list of eSIM-compatible devices for easy checking.
However, there are some cases when a device doesn’t support eSIM technology, even if it is listed as eSIM-capable.
Android is an open-source operating system, meaning any mobile device manufacturer or carrier can customise it. In some countries and regions, models may be released without eSIM capability. Or the airline from which you purchased your device may not have an eSIM feature enabled.
Follow the steps below to check if your Android device supports eSIM technology. Please keep in mind the steps may or may not apply to your device. The best way to confirm eSIM capability is still through your device manufacturer, vendor, or primary carrier.
For Samsung Galaxy devices:
- OPEN the Settings app, then TAP Connections.
- TAP SIM Manager.
- If Add eSIM is available, your device will likely support eSIMs.

Remember to contact your provider or device manufacturer to confirm if the above steps are possible for your device.
For Google Pixel devices:
- OPEN the Settings app, then TAP Network & Internet.
- TAP the + sign beside SIMs.
- If the Connect to Mobile Network page has a “Download a SIM instead?” option, your device is eSIM-capable.

Remember to contact your provider or device manufacturer to confirm if the above steps are possible for your device.
For other Android devices:
- DIAL *#06# and press the call button.
- If your device is eSIM-compatible, you should be able to view your device’s eSIM unique identification number (EID).

Your device also must be carrier-unlocked to use an eSIM. This enables you to use multiple SIMs and eSIMs from different carriers. You can follow these steps to check if your Android device is unlocked.
- Remove your phone’s SIM card.
- Replace the SIM card with the other SIM card from a different carrier.
- You can now see that the carrier’s name at the top of your home screen has changed.
- Now dial a call.
If the call connects, your phone is unlocked. If you can’t make a call right now, the phone is locked to the first carrier. At this moment, you may also see a notice on the screen saying that the phone is locked.
If you need clarification, check with your device manufacturer, vendor, or primary carrier to confirm eSIM capability.
39. What devices support eSIM?
The list below constantly expands as more eSIM-compatible devices get released into the market.
To use an eSIM, your device must be carrier-unlocked and eSIM-compatible. Please reference the list below to see if your device supports eSIM technology. (Note that country and carrier-specific restrictions may apply.)*
As of January 2024, the eSIM-compatible devices are as follows:
APPLE*
- iPhone 15
- iPhone 15 Plus
- iPhone 15 Pro
- iPhone 15 Pro Max
- iPhone 14
- iPhone 14 Plus
- iPhone 14 Pro
- iPhone 14 Pro Max
- iPhone 13
- iPhone 13 Mini
- iPhone 13 Pro
- iPhone 13 Pro Max
- iPhone 12
- iPhone 12 Mini
- iPhone 12 Pro
- iPhone 12 Pro Max
- iPhone 11
- iPhone 11 Pro
- iPhone 11 Pro Max
- iPhone XS
- iPhone XS Max
- iPhone XR
- iPhone SE (2020)
- iPhone SE (2022)
- iPad Air (3rd generation)
- iPad Air (4th generation)
- iPad Air (5th generation)
- iPad Pro 11-inch (1st generation)
- iPad Pro 11-inch (2nd generation)
- iPad Pro 11-inch (3rd generation)
- iPad Pro 11-inch (4th generation)
- iPad Pro 12.9-inch (3rd generation)
- iPad Pro 12.9-inch (4th generation)
- iPad Pro 12.9-inch (5th generation)
- iPad Pro 12.9-inch (6th generation)
- iPad (7th generation)
- iPad (8th generation)
- iPad (9th generation)
- iPad (10th generation)
- iPad Mini (5th generation)
- iPad Mini (6th generation)
*The following Apple devices DO NOT have eSIM capability:
• iPhone devices from Mainland China.
• iPhone devices from Hong Kong and Macao (except for the iPhone 13 Mini, iPhone 12 Mini, iPhone SE 2020, and iPhone XS).
*For iPhones and iPads purchased in TURKEY:
• If you’re setting up your device for the first time after June 23, 2020, your eSIM will activate after installation. Contact your carrier if you don’t have eSIM enabled.
• For devices set up before the above date, follow the steps in this link to activate your eSIM. The procedure may require you to erase your device’s data – please ensure you back up your device beforehand.
*Only iPad devices with Wi-Fi + Cellular features are supported.
SAMSUNG*
- Galaxy S23 FE*
- Galaxy A54 5G*
- Galaxy S23*
- Galaxy S23+*
- Galaxy S23 Ultra*
- Galaxy S22 5G*
- Galaxy S22+ 5G*
- Galaxy S22 Ultra 5G*
- Galaxy S21 5G*
- Galaxy S21+ 5G*
- Galaxy S21 Ultra 5G*
- Galaxy S20 5G*
- Galaxy S20*
- Galaxy S20+*
- Galaxy S20+ 5G*
- Galaxy S20 Ultra*
- Galaxy S20 Ultra 5G*
- Galaxy Z Flip
- Galaxy Z Flip 3 5G
- Galaxy Z Flip 4
- Galaxy Z Flip 5
- Galaxy Z Fold
- Galaxy Z Fold 2
- Galaxy Z Fold 3
- Galaxy Z Fold 4
- Galaxy Z Fold 5
- Galaxy Note 20
- Galaxy Note 20 5G
- Galaxy Note 20 Ultra
- Galaxy Note 20 Ultra 5G
*The following Samsung Galaxy devices DO NOT have eSIM capability:
• All Galaxy devices originating from China, Hong Kong, and Taiwan.
• All Galaxy FE “Fan Edition” models, except the Galaxy S23 FE.
• USA models of the Galaxy S20, S21*, and Note 20 Ultra.
*Most Samsung Galaxy devices purchased in South Korea do not support eSIMs, except for the Galaxy S23, S23+, S23 Ultra, Z Flip4, Z Fold4, Z Flip5, Z Fold5, A54 5G, and Galaxy S23 FE.
*Galaxy A54 5G eSIM availability may vary depending on country/region and carrier. Please contact your carrier or device manufacturer to confirm that your Galaxy A54 5G device is eSIM-capable.
*Galaxy S21 series devices (with the exception of FE models) from Canada and the USA may have eSIM capability as long as the One UI 4 update is installed. Please contact your carrier or device manufacturer to confirm your Samsung device is eSIM-capable.
GOOGLE PIXEL
- Pixel 8 Pro
- Pixel 8
- Pixel Fold
- Pixel 7 Pro
- Pixel 7a
- Pixel 7
- Pixel 6 Pro
- Pixel 6a
- Pixel 6
- Pixel 5a
- Pixel 5
- Pixel 4a
- Pixel 4
- Pixel 4 XL
- Pixel 3 & 3 XL*
- Pixel 3a & 3a XL*
*The following Google Pixel devices DO NOT have eSIM capability:
• Pixel 3 models originating from Australia, Taiwan, and Japan, and those purchased with service from US or Canadian carriers other than Sprint and Google Fi.
• Pixel 3a models purchased in South East Asia and with Verizon service.
HAMMER*
- Explorer PRO
- Blade 3
- Blade 5G
- myPhone NOW eSIM
- myPhone Hammer Construction
*eSIM support is only available in certain regions. Please contact your carrier or device manufacturer to confirm that your Hammer device is eSIM-capable.
HONOR*
- Magic5 Pro
- Magic4 Pro
- Honor 90
*eSIM support is only available in certain regions. Please contact your carrier or device manufacturer to confirm your Honor device is eSIM-capable.
HUAWEI
- P40
- P40 Pro*
- Mate 40 Pro
*The following HUAWEI devices DO NOT have eSIM capability:
• Huawei P40 Pro+
• All Huawei devices purchased in China are not eSIM capable.
MOTOROLA*
- Moto G54
- Edge 40 Neo
- Edge 40 Pro
- Edge+
- Razr 40 Ultra
- Razr 2022
- Razr 2019
- Razr 5G
- G53 5G
*eSIM support is only available in certain regions. Please contact your carrier or device manufacturer to confirm that your Motorola device is eSIM-capable.
NOKIA*
- G60
- XR21
- X30
*eSIM support is only available in certain regions. Please contact your carrier or device manufacturer to confirm your Nokia device is eSIM-capable.
ONEPLUS*
- OnePlus 12
- OnePlus 11
*eSIM support is only available in certain regions. Please contact your carrier or device manufacturer to confirm that your OnePlus device is eSIM-capable.
OPPO*
- Reno6 Pro 5G
- A55s 5G
- Find N2 Flip
- Find X3 Pro
- Find X5
- Find X5 Pro
- Reno A
*eSIM availability may vary depending on country/region and carrier. Please contact your carrier or device manufacturer to confirm that your Oppo device is eSIM-capable.
RAKUTEN*
- Rakuten Big
- Rakuten Big S
- Rakuten Mini
- Rakuten Hand
*eSIM support is only available in Japan and certain regions. Please contact your carrier or device manufacturer to confirm that your Rakuten device is eSIM-capable.
SHARP*
- AQUOS Sense 8
- AQUOS Sense 7
- AQUOS Sense 6
- AQUOS Sense 4 Lite
- AQUOS R8 Pro
- AQUOS R8
- AQUOS R7
- AQUOS R6
- AQUOS Wish
- AQUOS Zero 6
*eSIM support is only available in Japan and certain regions. Please contact your carrier or device manufacturer to confirm that your Aquos device is eSIM-capable.
SONY*
- Xperia 1 V
- Xperia 1 IV
- Xperia 5 IV
- Xperia 10 III Lite
- Xperia 10 IV*
*eSIM availability may vary depending on country/region and carrier. Please contact your carrier or device manufacturer to confirm that your Xperia device is eSIM-capable.
*Sony Xperia 10 IV eSIM support is only available in Europe. Please contact your carrier or device manufacturer to confirm that your Sony Xperia 10 IV device is eSIM-capable.
VIVO*
- X90 Pro*
- V29 (European Version)*
- V29 Lite 5G (European Version)*
*eSIM availability may vary depending on country/region and carrier. Please contact your carrier or device manufacturer to confirm that your vivo device is eSIM-capable.
XIAOMI*
- 14 Pro
- 13T
- 13T Pro
- 13
- 13 Pro
- 13 Lite
- 12T Pro
- Redmi Note 11 Pro 5G*
*eSIM availability may vary depending on country/region and carrier. Please contact your carrier or device manufacturer to confirm your Xiaomi device is eSIM-capable.
*Redmi Note 11 Pro 5G eSIM support is only available in Japan. Please contact your carrier or device manufacturer to confirm your Redmi Note 11 Pro 5G device is eSIM-capable.
OTHERS*
- Nuu Mobile X5
- Gemini PDA 4G+Wi-Fi
- Fairphone 4
*eSIM availability may vary depending on country/region and carrier. Please contact your carrier or device manufacturer to confirm your device is eSIM-capable.
WINDOWS 10*/ WINDOWS 11 LAPTOPS
ACER
- Acer Swift 3
- Acer Swift 7
- Acer TravelMate P2
- Acer TravelMate Spin P4
- Acer TravelMate P6
ASUS
- ASUS Mini Transformer T103HAF
- ASUS NovaGo TP370QL
- ASUS Vivobook Flip 14 TP401NA
DELL
- Dell Latitude 7440
- Dell Latitude 7210 2-in-1
- Dell Latitude 9410
- Dell Latitude 7310
- Dell Latitude 7410
- Dell Latitude 9510
- Dell Latitude 5410
- Dell Latitude 5411
- Dell Latitude 5511
HP
- HP Elitebook G5
- HP Probook G5
- HP Zbook G5
- HP Spectre Folio 13
LENOVO
- ThinkPad X1 Titanium Yoga 2 in 1
- ThinkPad X1 Carbon Gen 9
- ThinkPad X1 Fold
- ThinkPad X1 Nano
- ThinkPad X12 Detachable
- Lenovo Flex 5G
- Lenovo Yoga C630
- Lenovo Miix 630
- Lenovo Yoga 520
- Lenovo Yoga 720 (2-in-1 models)
SURFACE*
- Surface Pro 9
- Surface Go 3
- Surface Pro X
- Surface Duo 2
- Surface Duo
*For Windows 10: Your PC needs to have Windows 10 version 1703 or later for you to use an eSIM. The device also needs to be LTE-ready.
*Surface: Any AT&T-locked devices will not support eSIMs. If your device was purchased through another carrier, the carrier may have disabled the eSIM capability in the Surface Duo. Please contact the carrier to confirm.
40. How do I activate the eSIM on an iPhone or iPad in Turkey?
Some iPhones and iPads purchased in Turkey are reported to have eSIM disabled by default.
If you have purchased and activated your device after June 23, 2020, your eSIM will be activated after setup, and you don’t need to follow these instructions. If you don’t have eSIM enabled, contact your mobile carrier.
The instructions below will help you activate your eSIM for devices purchased before June 23, 2020. You must reset your device to complete the following procedure, so create a backup before continuing.
- Back up your device. Then make sure it’s updated to the latest iOS or iPadOS.
- Tap Settings > General > Transfer or Reset
- Tap Erase All Content and Settings.
- When asked, enter your passcode or Apple ID password. Then confirm that you want to erase your device.
- After the erase is complete, restore your iPhone or iPad from your backup.
Once done, you can set up an eSIM on your iPhone or iPad.
In addition, please be advised that according to Turkey’s local regulation, to use roaming data services for 91 days (accumulated) or more per 120-day period, the device’s IMEI should be registered with the Central Equipment Identity Register of Turkey. We kindly advise you to contact the CEIR for more information.
If you have any questions, please feel free to contact us through our support channels.

The eSIM Solution
The eDataSIM store offers a solution to the issue of high roaming charges by providing eSIMs, which are digital SIM cards. With eSIMs from eDataSIM, you can download and install a digital data package from over 200 countries and regions.
This means that you can be connected worldwide as soon as you arrive, without having to worry about expensive bills.